If your child is having a birthday, find out how to make three-dimensional numbers and letters from cardboard in order to decorate them with flowers from napkins, paper, and threads.
How to turn cardboard into the basis of three-dimensional letters and numbers?

Volumetric figures are decorated with a variety of materials, using corrugated paper, thread, and napkins. But the base is made from cardboard. If you want to make the number 1, then with your own hands you need to first make a blank for it.

The diagram below shows the recommended dimensions for this number. You will need 2 of these parts - one for the front side, the other for the back side, cut them out of cardboard. Decide how thick the number will be; you need to cut a strip of cardboard that wide.
It is better to carry out further manipulations together. Start at the top by first attaching a strip of side panel to the front using masking tape.
Please note that where the number bends, the tape must be cut evenly so that it fits well in this place.
After you attach a strip of cardboard to the front side of the number, you also need to glue it to the second side of this number, which will be the back.

All that remains is to glue one edge of the strip to the second at the top, after which you can tell yourself that you were able to make the number 1 with your own hands.

Let's see how to make the base for the next number. To make the number 2 from cardboard, transfer the presented template onto it with your own hands. To do this, you can use checkered paper and then draw larger cells on the template, thus transferring the design.
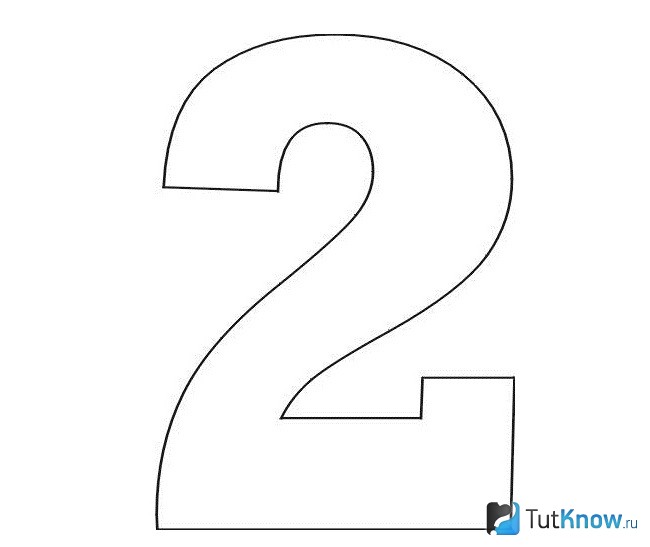
You can also draw it by hand, repeating the lines and bends of a given number. As in the first case, for work you will need:
- digit pattern;
- cardboard;
- construction tape;
- scissors.

Now attach the other half of the number.

As you can see, for this it is not necessary to glue the tape over the entire surface; you can attach it in small pieces, fixing it perpendicular to the surface.
Surely, you have already understood the technology of how to make a three-dimensional figure from cardboard. Using the same principle, you will make all other numbers if the events being celebrated require it. Now check out the various options for decorating such numbers.
How to make fringe to decorate letters and numbers?
To do this, you can use different types of paper: corrugated, colored, we’ll take white paper. In another way it is also called papyrus, wrapping. When you buy shoes, they are often wrapped in this thin, translucent material.
To make a volumetric figure using this principle, you will need:
- Silk paper of different colors;
- scissors;
- PVA glue.

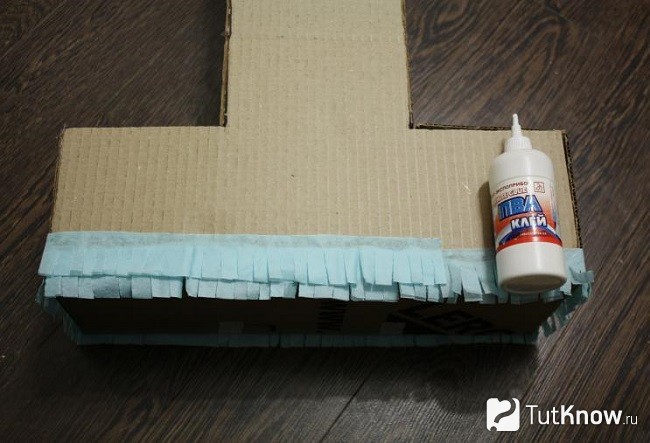
The long edges of these blanks need to be cut with fringe using scissors. To speed up this process, fold several strips at a time or roll each strip to create 4-5 layers.

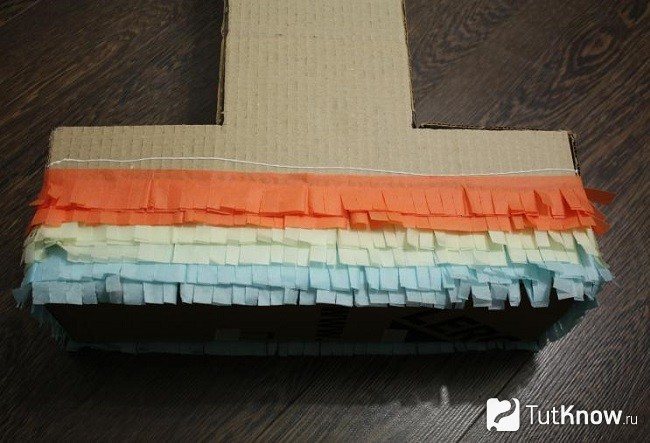
Apply numbers from PVA cardboard to the bottom and glue a strip of prepared paper here. Since it is very thin, it is better to glue two tapes at once. If you use colored or corrugated paper instead, then attach it in one layer. The second goes a little higher, located above the first.
Combine colors to make the number most effective.
After you have fully decorated it, decorate a corner of the apartment in the same colors.

Paper for 3D letters and numbers
Look at interesting design options for numbers from it.

To realize such a masterpiece, take:
- colored paper;
- scissors;
- double-sided tape or glue gun;
- a compass or round object.

- Using a compass or circular template, draw a circle on the back of the colored paper.
- Cut a small piece from the outside, how long it will be, this will be the width of the flower petals.
- Starting from here, cut this circle in a spiral, moving from the edges to the center.
- When this part of the work is completed, take the outer edge of the flower in your hand and begin to twist it.
- Fix the middle with a drop of glue, and also attach a small circle to the back of the flower with this solution so that the structure does not unwind.
- Glue these blanks onto cardboard numbers, placing them sparsely or frequently.
- For this you need to cut out just one blank from cardboard, then decorate it. To do this, cut the paper into strips 5–6 cm wide, paste them over the edges of the number to simultaneously decorate the front and back sides.
- Now we begin to twist flowers from these strips. To make the edges more voluminous, fold the edge of the paper here by about 2 cm.
- Bend the corner, make a turn, then bend the workpiece, make a turn again, bend the flower again, and so on.

See how to make roses from paper, the master class will help you with this. Such a flower can be made not only to decorate volumetric figures; it is also suitable for other occasions. But then you will need to additionally create a stem.
To make roses from corrugated paper, take:
- sheet of cardboard;
- pencil;
- ruler;
- scissors;
- corrugated paper;
- toothpick;
- glue stick.
Then place this cardboard assistant on top of the folded sheets of corrugated paper, cut out along the contours.

Straighten the resulting part, starting from the left edge, screw it onto a toothpick with the sharp end cut off. In this case, wire is used for this; take this idea into account when you make a paper flower with a stem. Tie at the bottom with thread.
When making a blank from corrugated paper, twist the inner petals tightly and the outer petals more loosely.
After making several of these blanks, decorate the cardboard numbers with flowers.

The master class will also help you make other roses from corrugated paper.
- Cut a strip of paper 6 cm wide. Fold it like an accordion.
- Use scissors to make the top edge rounded. Expand this part. Start twisting it so that the wavy edges are on top.
- Tie the rose at the bottom with thread.
- To make the petals look more picturesque, twist each petal onto a toothpick.

To make an openwork flower, take:
- corrugated paper;
- scissors;
- threads

In this way, decorate the entire edge of the strip; these tucks are similar to those you make on dumplings, holding their sides together.

Now twist this ribbon, giving it the shape of a blossoming bud. Tie with thread to secure.

Here is another option, it is very simple to implement.
If you want a flower made of corrugated paper to have a double color, then cut a strip from white, and the second, which will be wider, from a ribbon of a darker color.
Place two strips on top of each other so that the narrow one is on top. Roll them along the width like an accordion. Take this prepared fabric, starting from the narrow edge, twist it, giving it the shape of a flower.

The following idea will require the following materials and supporting equipment:
- corrugated paper;
- cardboard;
- compass;
- scissors;
- glue.
Manufacturing instructions:
- Fold the cut paper strip crosswise several times to immediately cut out a certain number of identical petals.
- Draw a circle on cardboard and cut it out. Step back a little from the edge of this blank, glue the petals, placing each subsequent one on the edge of the previous one.
- Having completed the first outer row in this way, make a second inner one, if you want, then cover the middle of the flower with petals.

The last master class in this series will tell you how to make the number 1 using colored paper.
- You already know how to make a template. Now cover the cardboard with colored paper. You need to cut strips out of paper, their width will be equal to the radius of the flower.
- Fold the first strip of paper, starting from the small edge, like an accordion. Now apply a little glue to this edge, attach the second small edge to it to turn the strip into a circle.
- Cover its core with a small circle of the same or another colored paper.
- You can make large and small flowers, arrange them on the figure as in the photo.

It's time to switch to another type of material, maybe you're just now thinking about how to make the number 2 using yarn?
Knitting threads for decorating letters and numbers
They are used to decorate three-dimensional figures. You can use yarn of one or more colors. For this decoration you will only need:
- preparing figures from cardboard;
- threads;
- PVA glue;
- brush.

When you're done with one color of yarn, glue the loose end to the cardboard. Next, attach the edge of the second ball of thread. Design the volumetric figure in a different color. When the number is completely covered with yarn, you can admire the beautiful results of your work.

In skillful hands, knitting threads will quickly turn into. You can make them using a fork, a semicircle of cardboard, or another method.
Step-by-step photos will also help you make pompoms from threads.

- As you can see, you first need to cut out two identical rings from cardboard. Place the thread inside.
- The yarn from the ball is wound around the rings, gradually filling them. Then cut along the outer circle, passing the scissors between the two cardboard blanks.
- Pull the thread and the fluffy pompom is ready.
- So make several in different sizes using different yarns.

Decoration of volumetric letters and numbers with ribbons
This material will also help solve the question of how to make volumetric figures.

To form the number 2 this way, take:
- red satin ribbon;
- white beads of various diameters;
- glue;
- scissors.
A glue gun will help fix beads of different diameters. They can also be sewn to fabric ribbons, but such work is more painstaking.
To implement the second variation you need:
- braid of the same width, but different colors;
- scissors;
- glue.

If you have enough free time and are patient, then you can make them, decorate the entire figure or just individual fragments.

If you want, use the already known master class to make such flowers or make them according to a different principle.

As you can see, you need to periodically bend the corners of the tape and secure them with a basting stitch. Once it is shaped like this, curl it to give the appearance of a rose. Secure the workpiece with thread and needle.
Zigzag braid is a ready-made flower base. It is enough to collect it on a thread, pull it, shape it into a circle, and secure it with a thread.

You can make not one circular row of such turns, but several. Each subsequent one will be slightly smaller in diameter than the previous one. Sew a button in the center and you can sew or glue the flower onto the number.

It can be not only flat, but also voluminous. For this you will need the same wavy braid. Cut two strips from it. Match them up as shown in the photo and stitch lengthwise to join. Now you will twist this ribbon so that it turns into a round flower. How to combine these two stripes can be seen in the next photo.

DIY roses and other flowers from napkins
For the next master class you will need:
- napkins;
- circle pattern;
- stapler;
- scissors.

Place several napkins, without unfolding them, one on top of the other. Place a circle on top. Cut out the napkins using this template.

In the center, these blanks need to be secured with a stapler. Lift the first layer and roll it up to resemble the inner, unopened rose bud. The second row of petals will be freer. Decorate the entire rose in this way.
Here's another idea. You need to take 8 napkins or papyrus paper and fold them like an accordion. Thicker multi-layer napkins are suitable for this method. You should end up with a voluminous rectangle. Trim the ends so they are rounded. Now begin to straighten the accordion-folded blanks, shaping them into a flower.

To make the number 1, you need to stick these roses over the entire surface. Look how beautiful flowers look in different sizes and colors.

- It will also allow you to create blanks for designing numbers. To do this, you need to cut the paper into squares, place a pencil in the center of each, and twist it.
- Without removing this square from the pencil, attach the blank to the cardboard base of the number, having previously coated this area with glue.
- The trim pieces need to be glued close to each other to create the effect of a single volumetric surface. Combining different paper colors would also be appropriate here.

Instead of glue, you can use plasticine. You need to lubricate the surface of the cardboard blank with it or roll a small ball out of plasticine, wrap each end with half a toothpick, insert such blanks into the plasticine balls. Then attach it to the cardboard base.
If you plan to hang the number on the wall, then you can make it from foam. In this case, the trim pieces are attached to a toothpick, then stuck into the foam. If the sheet of this material is not very thin, then you can make three-dimensional numbers and put them. They are more durable than thin foam.
How to make volumetric letters?
You will create them using the same principle. For this you will need:
- cardboard;
- pencil;
- scissors;
- paper towel tube;
- White paper;
- Hot melt glue.

Decide how wide the letter will be. Cut rings from a paper towel tube to this width.

Glue them onto one half of the letter, then glue the second half on top, pressing it slightly.

Cut sheets of white paper into strips, cover the sides of the letter with them, and then the entire letter.

You can paint these letters with acrylic paint or glue flowers made of paper or napkins, or decorate them with satin ribbons or threads. See how to make letters on cardboard by declaring them with fabric. You already know how to make a dense base. Glue strips of fabric onto it using PVA, and lace braid onto the outer corners.

From these letters you can form a word to arrange a photo shoot on your wedding day.

If you are celebrating the anniversary of this event, then place one or two numbers near the letters indicating how many years of marriage you are celebrating.
You can cover the letters with paper or wallpaper left over from the renovation.

An original and at the same time touching decor would be to decorate such a letter with family photographs.

If the birthday person loves the forest or you want to decorate the room according to this theme, then glue birch bark and moss or maple leaves to the base.
![]()
The Russian language is one of the most vibrant, interesting and rich languages in the world. Millions of the best works are written on it - stories, fairy tales, poems. The language is rich and will not be repeated. Like everything fundamental, the Russian language has its own basis - the alphabet.
The birth of the Russian alphabet
Work on the creation of the alphabet began in 860 by order of the ruler of Byzantium, Michael III. He commissioned two brothers from the Greek city of Thessaloniki: Cyril and Methodius, to form a written Slavic language. Later, the Cyrillic alphabet was formed from the Greek version of the alphabet by Bulgarian monks.
The formation of the Russian alphabet is directly related to the adoption of Christianity in Europe. Slavic writing began to spread from Bulgaria after Tsar Boris adopted Christianity in 860. It was in Bulgaria that the first written Slavic school was founded. In it, ancient writings - chronicles - were translated into Slavic. Further, the Old Church Slavonic language appeared in Serbia and Kievan Rus. It was the fact that Old Church Slavonic became the recognized language of the official Russian Church that influenced the fact that over time it replaced Old Russian. At the same time, it retained stable expressions and the folk tone of the speech of the Slavs.
Transformations of the Old Church Slavonic alphabet
Since the Russian alphabet was based on the Bulgarian Cyrillic alphabet, which spread after the Christianization of Rus', it initially had 43 letters.
Over time, 14 letters were deleted and 4 letters were added. This is due to the transformation of speech - sounds indicating unused letters have disappeared from it. First of all, the following were missing: iotized usas, large usas.
Under Patriarch His Holiness Nikon in the second half of the seventeenth century, a widespread census of books took place. This period is considered the time of reforms of Russian spelling. The serial numbers of the letters were recorded. But even at that time the alphabet was different from the modern one. Later, already under the reign of Peter I, superscript characters and some duplicate letters denoting numbers were excluded. At that time, Arabic numerals had already been introduced and the extra characters became irrelevant.
Back in 1917, the Russian alphabet had 35 letters. But as a result of the writing reform carried out in 1918, 33 letters remained in the Russian alphabet.
Structure of the Russian alphabet
Each word consists of minimal parts - sounds. They, like atoms in molecules, form the shell of the word. Each word and its form has a different sound design. What matters is the combination of letters in a word and the placement of stress.
In order to correctly distinguish the sound of a letter in a particular word, transcription is used. Transcription is a generally accepted graphical form that displays the sound of a word. Transcription shows:
- Syllables in a word.
- Which syllable is stressed in the word? Stress is indicated when a word consists of two or more syllables.
- Softness of consonants.
The letters of the alphabet are divided into several groups. The largest division of sounds is into vowels and consonants.
There are only six letters that are stressed vowels. When pronounced, the sound does not encounter any obstacles when passing through the oral cavity. When playing sounds, the ligaments of the larynx work - if you put your hand to your throat, you can feel the movement of the ligaments. If a person can freely shout or sing a letter, most likely it is a vowel sound. It is vowels that are the basis of syllables. The stressed syllable sounds most distinctly in a word. Unstressed syllables may be pronounced differently. That is why when writing words it is necessary to select test words.
When pronouncing consonants, sounds encounter an obstacle in their path. It is the presence of noise that distinguishes consonants and vowels. It is difficult to pronounce words with many consonants. That is why there are no words consisting only of consonants.
Consonants are divided into voiced and voiceless. There are unpaired and paired sounds.
Learning the Russian language begins with the alphabet. Understanding basic phonics and grammar is a key part of children's learning. By instilling in his child a love for his native language from infancy, a person pays tribute to history and traditions. Russian language is the richest language in the world. It is very important not to lose this wealth! Letters of the English alphabet can be downloaded.
Download beautiful letters of the Russian alphabet for printing in A4 format
 |
|
 |
|
 |
|
Before starting to learn the Russian language, any student must know its basis - the alphabet. You need to learn it in the very first lesson and you need to master this knowledge properly.

Any word in the Russian language consists of sounds, which are the basis of the shell of any word. Each word consists of a different sound design. The combination of letters in a word, as well as the stress, is of great importance.
In any language, including Russian, transcription is used to distinguish letters in words. It is transcription that helps to understand how a word sounds, giving it a generally accepted written form. The transcription will show the softness of the consonants, which syllables are in the word, as well as where the stress is located and which letters fall under it.
The letters of the alphabet can be divided into groups such as vowels and consonants. In addition, vowels can be stressed; this is only six letters. Shocked vowels are those vowels that, when pronouncing a sound, do not encounter an obstacle in the oral cavity. You can put your hand to your throat and feel how the ligaments vibrate. Any vowel can be shouted and sung. It is vowels that are the basis of any word, but stressed syllables sound distinctly, while unstressed syllables are more colorless.
Consonant sounds usually encounter an obstacle in their path during pronunciation. Usually such sounds are quite difficult to pronounce if they are in a row. The Russian language does not have words that consist only of consonants. Consonants can also be divided into voiced and voiceless, as well as paired and unpaired sounds.
Capital letters

When studying the alphabet, you must also study the writing of letters, as well as punctuation marks. Large capital letters will be very important and needed in all further education of children. To develop handwriting, you will need to show your child different fonts that are used to write a particular capital letter.
For the correct design of letters while writing, you can make reminders for children. You just need to take sheets of paper that are in A4 format, on which to print suitable and various stencils with capital letters. Use a wide variety of fonts so that children can best remember how to write one or another letter of the Russian language. Such pictures can be colored, you can draw small elements of decoration on them, but in such a way that they do not distract from the information that the stencils contain.
You can use classic comb-over fonts, original writing, floral and festive designs, the main thing is to show your imagination and involve children in creating such an alphabet; they will be interested in decorating and coloring capital letters on paper that is in A4 format.
Lower case
Learning the rules of how to write lowercase letters is just as important as uppercase letters. Therefore, in order to learn the entire alphabet this way, it would also be a good idea to use similar stencils and different fonts that can be printed on paper that is in A4 format.
Then lowercase letters will be learned much easier by children, and if printed pictures are hung up as an example, then children will better remember the Russian alphabet and learn to write different fonts using printed stencils as an example. It is the stencils that will become the basis for children to quickly memorize certain lowercase letters.
Russian alphabet
How to write letters beautifully to design a poster or stand.
From this article you will learn how to make a beautiful inscription for the design of a poster, stand, birthday or any other holiday.
Beautiful Russian letters printed in a beautiful font for design: letter templates, print and cut
You can organize a holiday without thematic inscriptions, but if you are preparing a stand or poster, then photographs or pictures alone will not be enough: after all, you need, at a minimum, to write a congratulation. You can’t do without text when decorating a holiday. Unusual and original letter templates are also useful in the advertising industry, as decorations that complement the theme of the event.
You can’t do without text when decorating a holiday.
- In order not to look for templates every time before the next event or event, you can find suitable stencils and cut them out on thick cardboard. Such blanks are suitable for repeated use.
- You will only need to attach the stencil to the space allocated for the inscription on the poster or wall and carefully apply a thin layer of paint. The letters must be filled in so that the paint does not leak under the stencil.
- You can have a great time with your child while preparing for the holiday. The very process of writing a text will interest the baby, a joint activity will contribute to the development of memory and awaken creative activity. Also, thanks to cutting out letters, the child will develop initial knowledge of the alphabet.

 How to write a beautiful inscription
 - You can cut the letters along the contour with scissors. But it is more convenient to do this with a stationery knife.
Beautiful letters are painted directly onto a concrete or asphalt surface. - Graphic elements can also be applied to wooden surfaces, metal surfaces, and bricks.
Knowing the technology of applying letters to a surface, you can independently make an inscription for any production facility or advertise your service sector. - Letters written according to a pre-prepared template look neat and clear, and you can imagine and select different options for writing text endlessly.
 Knowing the technology of applying letters to a surface, you can make any inscription yourself
 Options for beautiful block letters:


Beautiful printed font option No. 1


Option of beautiful block letters No. 3

 Option of beautiful block letters No. 3
Option of beautiful block letters No. 4
Beautiful Russian capital letters for design: letter templates, print and cut out
If you need to make an inscription in capital letters, then look for a suitable option in this section.
 Beautiful Russian capital letters for design: option No. 1
Beautiful Russian capital letters for design: option No. 2


: letter templates, print and cut
In this section you will find a selection of beautiful Russian letters for decorating a New Year's event.

 Beautiful Russian New Year letters for decoration
Beautiful Russian New Year letters for decoration


Beautiful New Year's inscription for decoration


Beautiful Russian New Year letters for decoration


To ensure that the inscription itself does not commemorate the frosty, clear days of winter, it is worth looking for appropriate letter templates to decorate the holiday. To make your search easier, we have collected them in this section.


Beautiful Russian capital letters for design: letter templates, print and cut out
- For years, art schools and other specialized educational institutions have been teaching how to create inscriptions and correctly place texts on a poster. Therefore, all the nuances of writing letters cannot be revealed in one article. We won't even try. After all, now there are a lot of ways to bypass the process of writing text: letters and entire inscriptions can be printed on a printer, redrawn from a finished poster or cover onto tracing paper, and then transferred to a poster or other surface.
- If necessary, you can simply paste the text printed on a black and white or color printer. But if you have time, you can experiment with colors, textures and apply paint in some unusual way.
 What tools do you need to write beautiful text?

Beautiful Russian capital letters for design

 Beautiful Russian capital letters for design
 Beautiful Russian letters with monograms for decoration: letter templates, print and cut out
- Get started by creating a sketch. You will reduce the time spent on creating a poster or inscription for an event if you write the text in a small format, displaying the maximum amount of detail.
- While preparing the sketch, you should have a clear idea of what your inscription should look like in the end. Finish execution can begin only after preliminary sketches. The decision about the location of the text also needs to be made at the sketching stage.
- When starting to write text, you should adhere to a simple and simple rule: all characters must have the same width. Also, the inscription should consist of the same combination of thin and wide lines. Do not write overlapping graphic elements, or have characters of different heights, lengths, or widths. Between letters, no matter what format you create them in, the same distance should be maintained.
- If the above requirements seem too complicated for you, then write the letters without complicating them with various additional elements. Take your time, because this activity is only for the patient.
- If you are not sure that you will be able to write a beautiful inscription on a large-format canvas, then use a stencil for the work. Now there are many sites where you can find stencils for printing, made in various styles.
- But if you find it difficult to draw using a stencil, then choose a suitable font and print the letters on your computer. Next, you will need to carefully cut out the letters and place them on the poster, gluing the bottom part. such an inscription will also look good.

 Beautiful Russian letters with monograms for decoration

Beautiful Russian letters with monograms
Beautiful Russian letters for decoration: letter templates, print and cut out
If you need to design a poster in a humorous way, with cheerful notes, then look at the letter templates presented in this section.


Beautiful Russian fairy letters for design: letter templates, print and cut out
To decorate a children's party in a fairy tale theme, special templates are suitable. All you need to do is find the ones that suit you from this section and print them.


Beautiful children's cartoon Russian letters for decoration: letter templates, print and cut out
A children's event can be decorated with original cartoon letters. Where can I find them? In this section!


Beautiful large Russian letters for design: letter templates, print and cut out
- Whatever font you choose for the design of your stand or poster, the letters should remain readable. Otherwise, the beauty you create will turn the text into a puzzle. When creating an inscription, you can, of course, be guided by your taste or idea of the design of the future text, but frills will only complicate the text, and not make it more beautiful.

- When using a computer program or ready-made templates, you should not count on the special “beauty” of the inscription or its uniqueness. This is explained simply: the creators of such templates do not bother searching for information about a well-created font.
- For example, you can click on one of the template links and see the letters in the presented font of different widths. Letters can be created in violation of all requirements. One font may contain rounded, wide letters and elongated ones, some may have protruding ends.
If you think this type of font is beautiful, then use it to design a poster. However, you should not expect that everyone will like the result.


Here's an example of a readable, simple font:

Beautiful Russian three-dimensional letters for design: letter templates, print and cut out


Beautiful multi-colored Russian letters for design: letter templates, print and cut out


Beautiful multi-colored Russian letters for decoration
 Beautiful multi-colored Russian letters for decoration
 Beautiful Russian letters with flowers for decoration: letter templates, print and cut out


How to beautifully write letters for the design of a poster, stand, holiday: samples of letters for writing
When creating text, follow the following sequence:
What you will need to create beautiful letters on a large format poster or sheet of whatman paper:
fountain pen for ink and ink
- set of nibs for fountain pens (nibs of different thicknesses)
- wide markers (special, for glossy surfaces)
- paint for these markers (specialized stores sell paint with various tints, for example, metallic)
- If you don’t have a fountain pen, you can use felt-tip pens, colored pencils, gouache or watercolor
 If you don’t have a fountain pen, you can use felt-tip pens, colored pencils, gouache or watercolor
 To write vertical dashes and lines, you can use a narrow tip; for the side parts of letters, use a wide tip. With this method of writing, letters acquire volume.
- If you decide to use markers or colored pencils, start by outlining the letters. This is done with a simple pencil. The outline is then outlined with a felt-tip pen, and only then the letter is painted over with paints or pencils.
- To prevent the inscription from looking boring, you can add shadows behind the letters. This will create the illusion of a wall behind the 3D letters, which will cast a shadow. Letters drawn in 3D also gain additional volume. Technical part: recommendations
- we decide where the inscription will be located
- Without pressing hard on a simple pencil, we make a horizontal line on the sheet (there should be no traces left after using the eraser): we apply alternating stripes according to the height of the font and the line spacing
- if you decide to make an inclined inscription, then immediately prepare an inclined line like a school copybook, but place the lines less frequently
- after drawing the auxiliary lines, we begin to write the letters with a simple pencil, maintaining maximum accuracy in reproducing the configuration and adhering to the width of the letters of the selected font
- mistakes made when writing letters are corrected immediately with an eraser
- We outline the finished inscription with a pen, felt-tip pen or marker
- do not erase draft and auxiliary lines (they can be removed only after the main inscription has completely dried)
- Print out your favorite template
- Place carbon paper on a sheet of Whatman paper
- Place the original text on top and trace it with a pen or pencil
- After this, remove the copy paper and template, trace the resulting contours again with a pen or felt-tip pen
How to apply text using carbon paper?
Don't be afraid to draw lines with a pen and pencil. The ink will cover the contours drawn earlier in pencil and the letters will be drawn evenly and equally. But if you skip the step of drawing pencil lines, the inscription will come out sloppy.
You can choose from the letter outlines proposed in our article and use them as cheat sheets when creating your text.
The question of how to make a stencil in Microsoft Word interests many users. The problem is that finding a sane answer to it on the Internet is not so easy. If you are interested in this topic, you have come to the right place, but first, let's figure out what a stencil is.
A stencil is a “perforated plate,” at least that is the meaning of the word exactly translated from Italian. We will briefly talk about how to make such a “plate” in the second half of this article, and immediately below we will share with you how to create the basis for a traditional stencil in Word.
If you are ready to get seriously confused and use your imagination at the same time, you can easily use any font provided in the standard set of the program to create a stencil. The main thing, when it is printed on paper, is to make jumpers - places that will not be cut out in the letters limited by the outline.

Actually, if you are ready to sweat so much over the stencil, it is not clear why you need our instructions, since you have all MS Word fonts at your disposal. Choose the one you like, write a word or type the alphabet and print it on a printer, and then cut them along the contour, not forgetting the jumpers.

If you are not ready to spend so much effort, time and energy and a classic-looking stencil suits you quite well, our task is to find, download and install that same classic stencil font. We are ready to save you from a grueling search - we found everything ourselves.
![]()
The Trafaret Kit Transparent font completely imitates the good old Soviet TS-1 stencils with one pleasant bonus - in addition to the Russian language, it also contains English, as well as a number of other characters not present in the original. You can download it from the author's website.
Setting the font
In order for the font you downloaded to appear in Word, you must first install it on the system. Actually, after this it will automatically appear in the program. You can learn how to do this from our article.

Creating a stencil base
Select Trafaret Kit Transparent from the list of fonts available in Word and create the desired inscription in it. If you need an alphabet stencil, write the alphabet on the document page. Other symbols can be added as needed.

The standard portrait orientation of a sheet in Word is not the most suitable solution for creating a stencil. It will look more familiar on a landscape page. Our instructions will help you change the position of the page.

Now the text needs to be formatted. Set the appropriate size, select the appropriate position on the page, and provide sufficient padding and spacing, both between letters and between words. Our instructions will help you do all this.

Perhaps the standard A4 sheet format will not be enough for you. If you want to change it to a larger one (A3, for example), our article will help you do this.

Note: When changing the sheet format, do not forget to change the font size and related parameters accordingly. No less important in this case are the capabilities of the printer on which the stencil will be printed - support for the selected paper format is required.
Stencil printing
Having written the alphabet or inscription and formatted this text, you can safely proceed to printing the document. If you don't know how to do this yet, be sure to read our instructions.

Creating a stencil
As you understand, there is practically no sense in a stencil printed on a regular piece of paper. It can hardly be used more than once. That is why the printed page with the base for the stencil needs to be “strengthened”. To do this you will need the following:
- Cardboard or polymer film;
- carbon copy;
- Scissors;
- Shoemaker or stationery knife;
- Pen or pencil;
- Board;
- Laminator (optional).
The printed text must be transferred to cardboard or plastic. In the case of transferring to cardboard, ordinary carbon paper (copy paper) will help to do this. You simply need to place the page with the stencil on the cardboard, placing carbon paper between them, and then trace the outline of the letters with a pencil or pen. If you don't have carbon paper, you can press the outlines of the letters with a pen. The same can be done with transparent plastic.
And yet, with transparent plastic it is more convenient, and it would simply be more correct to do it a little differently. Place a sheet of plastic on top of the stencil page and trace the outline of the letters with a pen.
After the stencil base created in Word is transferred to cardboard or plastic, all that remains is to cut out the empty spaces using scissors or a knife. The main thing is to do it strictly along the line. It is not difficult to move the knife along the edge of the letter, but the scissors must initially be “driven” into the place that will be cut, but not into the edge itself. It is better to cut plastic with a sharp knife, after placing it on a strong board.
If you have a laminator on hand, the printed sheet of paper with the stencil base can be laminated. Having done this, cut out the letters along the outline with a stationery knife or scissors.
When creating a stencil in Word, especially if it is an alphabet, try to make the distance between the letters (on all sides) no less than their width and height. If this is not critical for the presentation of the text, the distance can be made a little larger.
If to create a stencil you did not use the Trafaret Kit Transparent font we suggested, but any other (not stencil) presented in the standard Word set, let us remind you once again, do not forget about the jumpers in the letters. For letters whose outline is limited by internal space (an obvious example is the letters “O” and “B”, the number “8”), there must be at least two such jumpers.
That's all, now you know not only how to make a base for a stencil in Word, but also how to make a full-fledged, dense stencil with your own hands.