
We are pleased to invite you to AutoCad courses (AutoCAD). Our offer is relevant for those who plan to become a sought-after specialist, having mastered an interesting direction. You can always choose a program that meets all your wishes and skills.
Why take AutoCad training?
Computer-aided design systems are becoming more and more popular. They are used by designers, planners, engineers, artists. Modern programs allow you to reduce the time spent on performing the usual actions and improve the results of work.
Want to expand your options? Come to us!
1. AutoCad courses for beginners (from scratch) in Moscow, which are held at a low price, will be of interest to those who are taking their first steps in the profession.
2. Professional development is relevant for specialists who plan to expand their capabilities.
3. Advanced courses AutoCad (AutoCAD) + 3D attract those who are constantly improving and actively mastering three-dimensional modeling.
Training will allow:
Expand opportunities.
to save time,
get all the necessary skills and knowledge, increase income by getting a new position or starting your own business.
Why is it interesting and profitable to take AutoCad courses with us?
1. Autocad training (AutoCAD) is carried out using actual programs. Classes are built on the basis of popular areas.
2. Courses are taught by experienced teachers who are practicing professionals. They are able to interestingly present any material and reveal all the subtleties of the activity. From our teachers you will learn the professional secrets of craftsmanship and the real secrets of computer-aided design, which are not written about in standard manuals.
3. AutoCad training for beginners from scratch in Moscow is carried out at a bargain price. You do not overpay for classes, but you get the result you expect.
4. We provide training as soon as possible. You can attend classes without interrupting your main activity.
Come! We will name the exact prices for learning AutoCad for beginners from scratch in Moscow, we will tell you about all its features. You can easily choose an interesting program and start classes in the near future.
If you have searched through a bunch of sites for teaching this program, reviewed a lot of AutoCAD video tutorials, but did not get the desired result, then this article will definitely help you!!
All videos AutoCAD tutorials, training courses, all articles and publications chew on every command and function, which becomes boring and uninteresting. I propose a fundamentally new approach to teaching AutoCAD. After reading this article, you can get to work and do whatever you want!
This program is intended primarily for making drawings, because its development started back in 1982, and the first version was an ordinary electronic drawing board. Further, with the development of CAD (computer-aided design) technologies and 3D modeling, 3D functions were added. And many features that have eradicated routine operations. But, as in life, before we learn how to run, we need to learn how to walk, and even earlier, how to stand on our feet.
If you decide create drawing in autocad with your own hands, then you should have at least a small concept of space and geometry, at least a school level. To draw a line, you need two points. To draw a circle, you need a center and a radius. Did you know it? Then everything else will be easy!
How to download and install AutoCAD, you can read here.
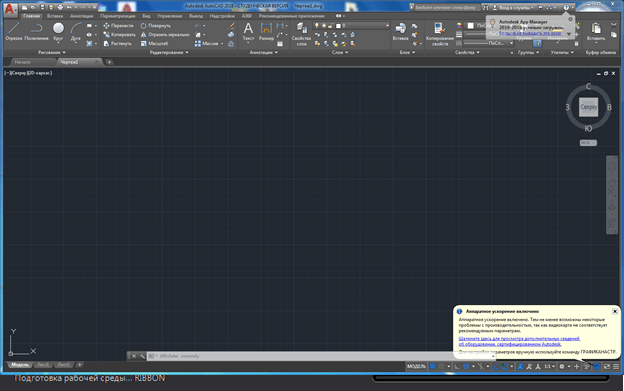
And so this miracle beast is on your computer. Let's run it. We will work in AutoCAD 2014, practically keeping up with the times. Because at this moment there is already AutoCAD 2015. But I will tell you that starting from the version of AutoCAD 2010 there are no special differences. Therefore, having any version from 10 to 14, except for versions LT (abbreviated edition), we continue.
The loading window looks nice and modern.

The first thing we see after launch is the AutoCAD Assistant. We see extension learning blocks and those that I sometimes use - recent files, create and open, but so far we don't need it. We close this window. Top right. All windows have a standard windows window structure at the top right, three buttons - close, minimize, and maximize. Sometimes there are none if it makes no sense to execute them for a given window. After closing the assistant, we see:

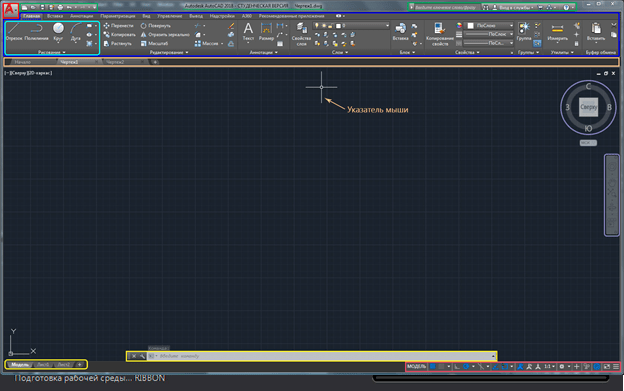
This is what the main AutoCAD window looks like. At the top is a ribbon interface that makes it easier to work with than standard panel interfaces. If this is not the case for you, then in the lower right corner, click on the gear icon and select "Drawing and Annotations".

And so, now the most interesting! Now you can draw!!
Decades of development of this program have made it alive in the truest sense of the word. If you are attentive, he will answer all your questions himself.
To create a drawing of any complexity, about 15-25 teams are enough, which are located in three blocks in the most visible place.

Click on the inscriptions under the ribbon blocks and get the detailed functions.

Under most of the buttons, there are triangles that also bring up a context menu.
We know that the world is made up of molecules. So any drawing can be created from primitives. As soon as you click on any icon. A dialog with the program will appear at the bottom of the command line. Read carefully and you'll be fine!!
For example, the segment command. Select the first point then the second point whatever is specified on the command line.
The program is intuitive, if you hover over the button and wait a couple of seconds, a hint will appear on how it works.
Esc- deselect, cancel action,
Del- delete selection
ctrl+z- take a step back
Turn the wheel to zoom in, zoom out
Click on the wheel + move the mouse to move the drawing.
Read the command line, use these three panels and everything will work out! If you have drawn a segment that does not fit in the allocated space, on the command line, write the command - REGEN and press Enter.
With these commands, you can draw everything. I did not deceive, if YOU now think so. It will be long, difficult, tedious, but possible. If there is a desire
So, ? Have you read this sentence? Fine! So it's time for us to say hello! Good day! We are very pleased to welcome you to our website. A separate section of which is devoted to one of the most popular programs in the construction industry around the world. In Russia, including from Autodesk.
A huge number of articles / notes / textbooks and other literature have been written about this software product. Our site will not be the first to teach you how to get started with AutoCAD.
Our articles and training materials are compiled in such a way that the final result, aimed at mastering all the necessary functions of AutoCAD CAD, is achieved in the shortest possible time.
With an effective system of introducing theoretical knowledge into practical significance for each of you.
And most importantly - training on our website is absolutely FREE!
There are always people who ask: "?". Or they don't know how to ask and where to start.
So it's time to start our work. As we promised, there will not be a lot of unnecessary chatter and abstruse phrases from textbooks or other literature. Only Q&A. And anticipating your first question: Where to get Autocad?”, - we answer: “Go to the site https://www.autodesk.ru” and register there to get a full-featured version of AutoCAD for educational purposes absolutely free.
If you have any problems with registering or installing the program, be sure to read our article "Registration on the Autodesk Education Community website" and "". In the meantime, we believe that you have AutoCAD version 2018 or lower installed on your computer. But not lower than 2013.
How to get started in AutoCAD? Begin!
And so, we are looking for a shortcut on the desktop to launch it and run it!
A rather complex and powerful program, but despite this, it can work on not quite new computers. However, this depends on the complexity and size of the files you are working with.
In other words, if you have a large complex drawing, then it will require more computing power from the computer.

But launching a program is always a slow process. So be prepared to wait a bit.

You can speed up the launch of AutoCAD by installing the program on a modern high-speed solid-state SSD drive.

After starting the program, you will see the program window:
We have specially highlighted the most significant elements of the interface of the AutoCAD window with different colors. And now let's talk about each of them. Top/down, left/right and in order! J Let's go!
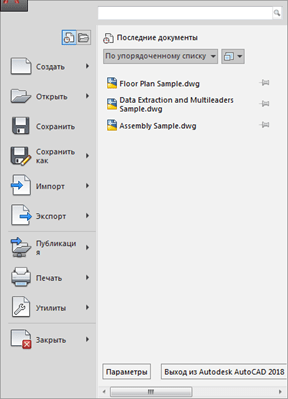
The button for calling the main menu of the program is surrounded by a red rectangle, with the help of which you can "Create a file", Open an existing one, Save, Print or Export a drawing file to another format.
For example, in PDF format, for viewing on a computer where AutoCAD is not installed. Or for demonstration to the customer. There is also a list of the latest files you have worked with for quick and easy opening.
Highlighted in green is the "Quick Access Toolbar", which contains commands from the "Main Menu", as well as other useful commands.
The contents of the panel can be customized by clicking on the button with a small triangle at the end of the panel, pointing down.
The panel adaptation menu will open and by checking or unchecking the necessary checkboxes, we add or remove command buttons from the panel.

The name of the program, license type and file name are displayed in the center of the title bar of the window. "Drawing 1.dwg" is the "default" name of the AutoCAD file and will change when we save the file under our own name. ".dwg" is an AutoCAD file extension. Because of this abbreviation, Russian-speaking users also call AutoCAD files “devageshki”.
On the right side of the title bar is the "Cloud Menu" which allows you to access help information and "cloud services" from Autodesk.
Below, in blue, "Team Ribbon" is highlighted. AutoCAD, like many programs, has a modern "ribbon interface" that allows you to optimize the window's workspace.
Giving the user access to the necessary commands in the minimum number of mouse clicks.
The name of the "active" ribbon of commands in the figure is underlined with a blue dotted line "Main". Clicking on other tabs activates the transition to them.
Each team ribbon is divided into "Areas". For example, in the figure blue the area of commands "Drawing" is highlighted in color.
The names of the areas were not chosen randomly. They tell the user which buttons of which commands are collected on this area.
For example, the buttons in the "Drawing" command area are responsible for creating 2D primitives and other elements (circle, rectangle, arc...).
Button interface element
Separately, I would like to note the interface element of the command buttons, which is found in different areas of different buttons - this is a “small triangle”, pointing downwards.
It tells us that this button is responsible for several, logically combined commands. Simply put, this button can execute not one command, but several.
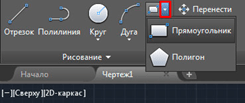
For example, clicking on the triangle / arrow next to the button with the “Rectangle” construction command opens access to the “Polygon” construction button, or, as it is now called in AutoCAD, “Polygon”.
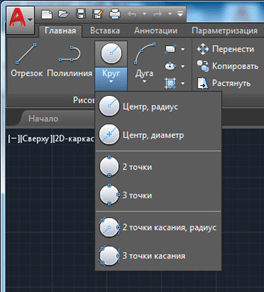
The number of additional command buttons can be small (two/three new commands). Or, as in the case of the "Circle" team, a rather impressive list of new teams will open before you.
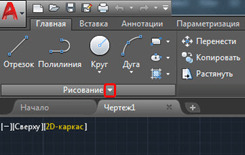

The same small triangle / arrow that we met earlier on the quick access panel. To open the panel adaptation menu, it is also found near the names of the command areas.
Clicking on it will open access to additional buttons, the commands of which are used less often than those that are always present in the area.
Yes, I would like to point out the fact that not all commands are present on the command ribbons and panels. Some commands can be run from the command line, but we'll talk about that later.
And so, we remind you that we are considering the “AutoCAD Program Interface” using the example of version 2018. Having studied the main elements of the upper part of the program window, we move on to the main workspace of the AutoCAD program.
The workspace starts right after the command ribbon. It is titled by labels or tabs of open files. They are highlighted with an orange rectangle in our figure.
How many files can be used in AutoCAD at the same time?
AutoCAD can work with several files at the same time. And instead of the tabs "Drawing1", "Drawing2" you will have the names of these files.
The working field is represented by "infinite space" or "model space" divided into cells. It is here, in model space, that we will create 2D primitives, circles and rectangles. Use the "Polyline" tool and, by editing all this - get the finished drawing!
In the upper right corner of the working field there is a "compass". Or it is also called "species cube". It is circled in purple.
His job is to help us. Navigate in model space, since in AutoCAD you can not only create 2D elements, but also model in 3D, but first things first.
Also, below the view cube, there is an additional panel that allows you to control the view of the workspace.
At the bottom of the window, there is one of the most important interface elements - "Command line" or "Command line".
She's highlighted yellow rectangle in our drawing. Here you can "manually", using the keyboard, give AutoCAD commands to perform various actions, whether it be creating elements or editing them, and indeed, system commands.
Also, yellow the rectangle marks the tabs for switching between "model space" and "paper space".
We will cover them in our next articles. As well as the panel highlighted in red, where there are buttons to enable or disable additional modeling modes.
This concludes our article. We examined the interface of the AutoCAD program, got acquainted with the basic concepts of the program window.
And now we already know where and what to “press”! Now you can try to click the mouse yourself by choosing various commands for building elements.
And in the next article, we will take a closer look at the commands for creating 2D drawing elements.
Dear users, we want to inform you that some anti-virus programs falsely work on the distribution package of the MediaGet program, considering it to be infected. This software does not contain any malware and viruses, and many of the antiviruses simply warn you that this is a Downloader. If you want to avoid such problems, just add MediaGet to the list of trusted programs in your antivirus program.
How to download
By selecting the desired version of the program and clicking the link, the MediaGet application distribution package will be downloaded to your computer, which will be located in the Downloads folder for your browser. Find this file and run it.


In the next window, click the "Continue" button, thereby accepting the user agreement. Next, the installation of the application takes place, which takes some time.

After installation, the application starts and automatically starts downloading the program you have chosen. You can find the downloaded files in the folder you chose to install the MediaGet application.
How to install
Unpack the downloaded archive using standard WinRar or 7-Zip programs.
If the file is in the form of an image with the extension .iso, it can be opened using the free program Daemon tools lite or Nero
After extracting the installation files, find and run the program's executable file, which usually has the extension .exe
Act according to further prompts of the installer program and do not interrupt the installation process of the program in an incorrect way.
Please note that the software provided is made available solely for your personal use and information. All files available for download are free of viruses and malware.
So, ? Have you read this sentence? Fine! So it's time for us to say hello! Good day! We are very pleased to welcome you to our website. A separate section of which is devoted to one of the most popular programs in the construction industry around the world. In Russia, including from Autodesk.
A huge number of articles / notes / textbooks and other literature have been written about this software product. Our site will not be the first to teach you how to get started with AutoCAD.
Our articles and training materials are compiled in such a way that the final result, aimed at mastering all the necessary functions of AutoCAD CAD, is achieved in the shortest possible time.
With an effective system of introducing theoretical knowledge into practical significance for each of you.
And most importantly - training on our website is absolutely FREE!
There are always people who ask: "?". Or they don't know how to ask and where to start.
So it's time to start our work. As we promised, there will not be a lot of unnecessary chatter and abstruse phrases from textbooks or other literature. Only Q&A. And anticipating your first question: Where to get Autocad?”, - we answer: “Go to the site https://www.autodesk.ru” and register there to get a full-featured version of AutoCAD for educational purposes absolutely free.
If you have any problems with registering or installing the program, be sure to read our article "Registration on the Autodesk Education Community website" and "". In the meantime, we believe that you have AutoCAD version 2018 or lower installed on your computer. But not lower than 2013.
How to get started in AutoCAD? Begin!
And so, we are looking for a shortcut on the desktop to launch it and run it!
A rather complex and powerful program, but despite this, it can work on not quite new computers. However, this depends on the complexity and size of the files you are working with.
In other words, if you have a large complex drawing, then it will require more computing power from the computer.
But launching a program is always a slow process. So be prepared to wait a bit.
You can speed up the launch of AutoCAD by installing the program on a modern high-speed solid-state SSD drive.
After starting the program, you will see the program window:
We have specially highlighted the most significant elements of the interface of the AutoCAD window with different colors. And now let's talk about each of them. Top/down, left/right and in order! J Let's go!
The button for calling the main menu of the program is surrounded by a red rectangle, with the help of which you can "Create a file", Open an existing one, Save, Print or Export a drawing file to another format.
For example, in PDF format, for viewing on a computer where AutoCAD is not installed. Or for demonstration to the customer. There is also a list of the latest files you have worked with for quick and easy opening.
Highlighted in green is the "Quick Access Toolbar", which contains commands from the "Main Menu", as well as other useful commands.
The contents of the panel can be customized by clicking on the button with a small triangle at the end of the panel, pointing down.
The panel adaptation menu will open and by checking or unchecking the necessary checkboxes, we add or remove command buttons from the panel.
The name of the program, license type and file name are displayed in the center of the title bar of the window. "Drawing 1.dwg" is the "default" name of the AutoCAD file and will change when we save the file under our own name. ".dwg" is an AutoCAD file extension. Because of this abbreviation, Russian-speaking users also call AutoCAD files “devageshki”.
On the right side of the title bar is the "Cloud Menu" which allows you to access help information and "cloud services" from Autodesk.
Below, in blue, "Team Ribbon" is highlighted. AutoCAD, like many programs, has a modern "ribbon interface" that allows you to optimize the window's workspace.
Giving the user access to the necessary commands in the minimum number of mouse clicks.
The name of the "active" ribbon of commands in the figure is underlined with a blue dotted line "Main". Clicking on other tabs activates the transition to them.
Each team ribbon is divided into "Areas". For example, in the figure blue the area of commands "Drawing" is highlighted in color.
The names of the areas were not chosen randomly. They tell the user which buttons of which commands are collected on this area.
For example, the buttons in the "Drawing" command area are responsible for creating 2D primitives and other elements (circle, rectangle, arc...).
Button interface element
Separately, I would like to note the interface element of the command buttons, which is found in different areas of different buttons - this is a “small triangle”, pointing downwards.
It tells us that this button is responsible for several, logically combined commands. Simply put, this button can execute not one command, but several.
For example, clicking on the triangle / arrow next to the button with the “Rectangle” construction command opens access to the “Polygon” construction button, or, as it is now called in AutoCAD, “Polygon”.
The number of additional command buttons can be small (two/three new commands). Or, as in the case of the "Circle" team, a rather impressive list of new teams will open before you.
The same small triangle / arrow that we met earlier on the quick access panel. To open the panel adaptation menu, it is also found near the names of the command areas.
Clicking on it will open access to additional buttons, the commands of which are used less often than those that are always present in the area.
Yes, I would like to point out the fact that not all commands are present on the command ribbons and panels. Some commands can be run from the command line, but we'll talk about that later.
And so, we remind you that we are considering the “AutoCAD Program Interface” using the example of version 2018. Having studied the main elements of the upper part of the program window, we move on to the main workspace of the AutoCAD program.
The workspace starts right after the command ribbon. It is titled by labels or tabs of open files. They are highlighted with an orange rectangle in our figure.
How many files can be used in AutoCAD at the same time?
AutoCAD can work with several files at the same time. And instead of the tabs "Drawing1", "Drawing2" you will have the names of these files.
The working field is represented by "infinite space" or "model space" divided into cells. It is here, in model space, that we will create 2D primitives, circles and rectangles. Use the "Polyline" tool and, by editing all this - get the finished drawing!
In the upper right corner of the working field there is a "compass". Or it is also called "species cube". It is circled in purple.
His job is to help us. Navigate in model space, since in AutoCAD you can not only create 2D elements, but also model in 3D, but first things first.
Also, below the view cube, there is an additional panel that allows you to control the view of the workspace.
At the bottom of the window, there is one of the most important interface elements - "Command line" or "Command line".
She's highlighted yellow rectangle in our drawing. Here you can "manually", using the keyboard, give AutoCAD commands to perform various actions, whether it be creating elements or editing them, and indeed, system commands.
Also, yellow the rectangle marks the tabs for switching between "model space" and "paper space".
We will cover them in our next articles. As well as the panel highlighted in red, where there are buttons to enable or disable additional modeling modes.
This concludes our article. We examined the interface of the AutoCAD program, got acquainted with the basic concepts of the program window.
And now we already know where and what to “press”! Now you can try to click the mouse yourself by choosing various commands for building elements.
And in the next article, we will take a closer look at the commands for creating 2D drawing elements.